Google+ Sandeepa On Life: June 2011

Pages

Search this blog

Wednesday, June 15, 2011

BSNL 3G: How To Recharge Online

So you have a BSNL prepaid 3G card and don't know how to recharge it online? Here's how you can do it.

  1. Visit BSNL's website http://www.bsnl.co.in/
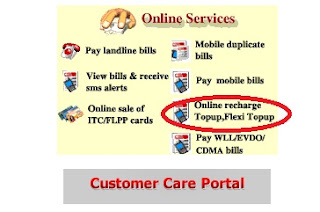
  2. Look out for the link(looks like the picture below!) for "Online recharge Topup, Flexi topup", click on it. Or click here if you can't find it there.
  3. Sign up by visiting http://portal.bsnl.in/portal/aspxfiles/registration.aspx if you do not already have a login.
  4. Login to recharge site using your login and password. You should see something like this screenshot.
  5. Choose the recharge or topup option based on your need. The data recharge and data topup options are similar to voice recharge and voice topup respectively. i. e.,
    1. BSNL 3G Data Topup: You get only extra data recharge and no extension to your validity!
    2. BSNL 3G Data Recharge: This options gives you both. Validity and data recharge. 
  6. Enter your 3G sim number. If you are using your 3G SIM with a data card, you are not likely to remember your 3G number. Double check the number by checking it from BSNL 3G application on your computer.
  7. Select the amount you want to recharge or topup your 3G mobile with.

    The numbers you see in the drop down do not make much sense! Unless you are familiar with BSNL 3G recharge plans, their validity and how much data you get to use in each plan.
    Go to their 3G website to learn more about the plans. Pick your plan and select the amount.
  8. Click on the Submit button to proceed for payment.
  9. Choose a payment method in the following page. They support bank transfers, Debit cards and credit cards.
  10. Go ahead with online payment just like the way you usually do.
  11. Take a print out of the receipt or save it on your computer for future reference.
  12. Continue to use your 3G card/mobile.
***************************************************
           Related Link

    Wednesday, June 8, 2011

    How To Disable Facebook's Tag Suggestions

    Yesterday Facebook rolled out a new feature called Tag Suggestions.

    According to a blog post on The Facebook Blog, this is what the feature is all about:
    "When you or a friend upload new photos, we use face recognition software—similar to that found in many photo editing tools—to match your new photos to other photos you're tagged in. We group similar photos together and, whenever possible, suggest the name of the friend in the photos."
    Not surprisingly, this Face Recognition feature is enabled by default! This may be useful for some people who upload photos in bulk and tag everybody in every picture.

    For others, if you don't want Facebook to automatically detect your face and suggest tag to friends, here's how you can disable this feature. It's very simple! (takes only 7 clicks!)

    1. Click on Account 
    2. Click on Privacy Settings

      Privacy Settings page
    3. Click on Customize settings

    4. Scroll down to "Things others share" section. Click on the Edit Settings next to
      Suggest photos of me to friends
      When photos look like me, suggest my name

    5. Click on Enabled and change it to Disabled
    6. Click on Okay to save that setting.
    7. Congratulations! Now you can continue with your Facebooking, or whatever else you were doing before coming here :-)

    Monday, June 6, 2011

    How To Create a Facebook Page For Your Blog

    If you like to create a platform for all your blog readers to know each other and discuss about your blog,  Facebook Page is a good start. You can create a Facebook page for your blog. That will not only help your existing readers to network with each other, but also to easily share your blog posts on Facebook and increase readership. After creating the Facebook Page, you can create a 'Like box' and add it to your blog so that people who visit your blog can find the link to your facebook page and can 'Like' your page without leaving your blog.

    I just created a Facebook page for this blog. You can find the page here.

    Now I will share how to do it.

    First you need to create a Facebook page for your blog. Do the following:
    1. Login to your Facebook account. Scroll down to the end of the page. Click on the "Create a Page" link
      OR
      Click here to go start creating facebook page.
    2. Facebook will ask you to choose a category for your page. As of now, it has  6 categories at the top level. Choose "Brand or Product". I chose this because, this is the only category that had 'website' sub-category!
    3. Choose 'website' as sub category.
    4. Enter the name of the page. Keep it same as the title of your blog so that people can recognize it easily! (I used "My Life My Way")

    5. Now your page is ready! And you can see it has URL of it's own.
    6. Click on Edit info link to fill in details about your blog.
    7. Write a brief description in "Description" field.
    8. important: Paste the link to your blog in the "Website:" field. (http://sandeepaonlife.blogspot.com/)
    After this, you can follow the steps on your page to..
    1.  Add a profile image
    2. Invite your friends
    3. Tell your fans
    4. Post status updates
    5. Promote this Page on your website
    6. Set up your mobile phone
    Now that we have a facebook page, let's see how to add a 'Like box' to your blog.
    1. Click on the "Add Like Box" button.
    2. In the page that shows up, customize the Like Box for your blog
      1. Change the URL to point to your newly created facebook page
      2. Change the width of the widget if you want
      3. Pick a color scheme (to match your blog's theme)
      4. My Like Box looked something like this.
      5. My Like Box Looked like this
      6. As you customize your like box, verify the changes in the preview.
      7. Once you are happy with your customization, click on "Get Code" button.
    3. Get the code for the widget (copy it to clip board)


    4. Add it to your blog(Steps for Blogger blogs.)
      1. Login to your blogger account
      2. Goto "Design" tab of your blog 
      3. Click on the "Add a Gadget" link
      4. Choose HTML/JavaScript
      5. Paste the code you copied in step 3 above
      6. And save the widget!
      7. Congratulations! Now you have Like Box for your Facebook page integrated to your blog.
        (You can see the Like Box on the right side of this blog. You can see it working! )
    If you run into any problem/errors during this, share it in comments. I would be happy to assist.