Google+ Sandeepa On Life: help

Pages

Search this blog

Showing posts with label help. Show all posts

Tuesday, April 10, 2012

Facebook Messenger for Windows

Facebook recently announced launch of Facebook Messenger for desktop. They are promoting this new Windows app. They want us to keep using Facebook even when we are not using a browser. From their website:
Messenger is a new app that brings Facebook to your desktop. While you surf the web or use other applications on your computer, you can: 
  • Chat and message with your friends on Facebook
  • See the latest updates from your friends in ticker
  • Get quick notifications about what’s going on

Messenger lets you use Facebook without being on www.facebook.com. You will now be able to stay in touch anytime, no matter what you're doing. 
When I logged into my Facebook account today, I saw a small popup box in the bottom right corner of the page suggesting me to install the Windows App.

Facebook Windows app banner

Though I do not use Facebook chat much, nor I like to receive ticker updates from friends, I decided to give this a try. So, I started by clicking on the "Install Messenger" button.

Installing Facebook Messenger for Windows 7
You will need to Windows 7 to run this app. If you are on Windows 7, follow these steps.


  1. Go to Facebook Messenger home page  http://www.facebook.com/about/messenger
  2. Click on the Install button seen on that page. This will download a small setup file called FacebookMessengerSetup.exe 
  3. Double click on the downloaded file to run it. Click on the "Run" button on Windows security alert.
  4. Continue the installation by clicking Install button. 
  5. Make sure your firewall(if you have one) is configured to allow this new application to connect to internet.
  6. You are ready to go! Now you should be able to use the messenger to see ticker updates from friends and to chat with friends.
                                                   
  7. Enjoy Facebooking!
  8. For more information and help, visit Frequently Asked Questions(FAQs).

Monday, August 8, 2011

Picasa: How to add watermarks to photos

A friend mentioned today that it hurts when someone uses your photos and don't give you the credit for it. I completely understand his feelings. It happened with me. It happens with everybody!

There are many tools available to add watermarks to your photos. Here I'm going to tell you how to do it using Picasa. Because that's what I use!

You have to think about adding a watermark(some copyright) only when you are sharing the photo with others.  Using Picasa you can share photos with others mainly in two ways. By uploading them to a web album and sharing the link, or by exporting the photos to a folder.

We will see how to add watermark to your photos in both these cases.


  1. How to add watermarks while uploading photos to Picasa Web Album
    1. Open Picasa
    2. Goto Tools -> Options -> Web Albums
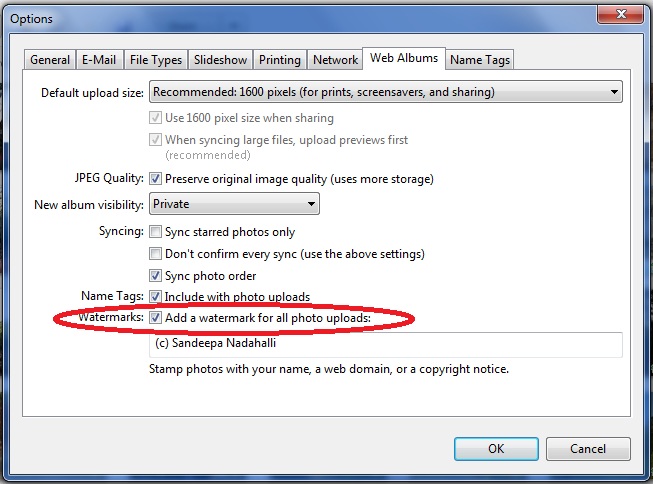
    3. In the dialog that pop's up,(see image below) select the check box for Watermarks.


    4. Enter the text for your water mark in the text box given. As you can see in the screenshot, I use "(c) Sandeepa Nadahalli".
    5. Click OK to exit the settings dialog. Your photos will be watermarked with the given text when you upload them.
  2. How to add watermarks while exporting photos from Picasa.
    1. Select the photos or Album you want to export
    2. Goto File -> Export Picture to Folder
    3. Select the check box next to Watermark:
    4. Enter the text to be used for watermarking.
    5. Click on the export button!
Here is a photo with a watermark (from my Picasa Web Album ).

Wednesday, June 15, 2011

BSNL 3G: How To Recharge Online

So you have a BSNL prepaid 3G card and don't know how to recharge it online? Here's how you can do it.

  1. Visit BSNL's website http://www.bsnl.co.in/
  2. Look out for the link(looks like the picture below!) for "Online recharge Topup, Flexi topup", click on it. Or click here if you can't find it there.
  3. Sign up by visiting http://portal.bsnl.in/portal/aspxfiles/registration.aspx if you do not already have a login.
  4. Login to recharge site using your login and password. You should see something like this screenshot.
  5. Choose the recharge or topup option based on your need. The data recharge and data topup options are similar to voice recharge and voice topup respectively. i. e.,
    1. BSNL 3G Data Topup: You get only extra data recharge and no extension to your validity!
    2. BSNL 3G Data Recharge: This options gives you both. Validity and data recharge. 
  6. Enter your 3G sim number. If you are using your 3G SIM with a data card, you are not likely to remember your 3G number. Double check the number by checking it from BSNL 3G application on your computer.
  7. Select the amount you want to recharge or topup your 3G mobile with.

    The numbers you see in the drop down do not make much sense! Unless you are familiar with BSNL 3G recharge plans, their validity and how much data you get to use in each plan.
    Go to their 3G website to learn more about the plans. Pick your plan and select the amount.
  8. Click on the Submit button to proceed for payment.
  9. Choose a payment method in the following page. They support bank transfers, Debit cards and credit cards.
  10. Go ahead with online payment just like the way you usually do.
  11. Take a print out of the receipt or save it on your computer for future reference.
  12. Continue to use your 3G card/mobile.
***************************************************
           Related Link

    Wednesday, May 25, 2011

    How to display Ads on your blog using Google AdSense


    You might have heard about people making money by displaying ads on their blogs using services like Google AdSense.

    If you have a Blogger blog, setting up AdSense is fairly simple. Just follow these steps.

    Step 1:
              Sign up for Google AdSense. The approval may take anywhere between few hours to many days. 

    Step 2: Once you have an activated AdSense account,
    • Login to Blogger.
    • Goto Monetize tab of your blog by clicking on Montize from your blogger dashboard.
    • Monetize link in Dashboard
      In 'Adsense overview' tab, configure how and where you want the ads to appear.
    Configure ads
    • Choose/login to your adsense account that you created in step 1.
    • And you are done! Now you track the ad statistics from this tab! Congrats :)
    Track your earnings!
    P.S: I just did this to my blog.