Google+ Sandeepa On Life

Pages

Search this blog

Sunday, August 14, 2011

Karnataka Jnana Ayoga Announces Eligibility list for Jnana Fellowship 2011

Karnataka Jnana Ayoga on 12th August 2011 announced the list of eligible candidates for its Jnana Fellowship 2011 program.

Click here to download the spreadsheet containing name and other details of shortlisted candidates. The official announcement of the result can be found here.

Background

Karnataka Jnana Ayoga(KJA) had called for applications for its Jnana Fellowship Program 2011. Best part was that you could apply for the fellowship online!

What next?

  • After processing the applications, the KJA as announced the list of eligible candidates.
  • If you had applied and you are shortlisted, the start preparing for verification of documents.
    • When:
       August 21st 2011 at 9 AM
    • Where:
      Government R.C. College of Commerce and Management, Basaveshwara Circle, Palace Road, Bangalore-560 001
    • What documents:
      • All Marks Cards (SSLC; PUC/Diploma; Graduation(all semesters); Post Graduation(all semesters); Certificate of M Phil; Ph.D. etc.,)
      • Offer Letter of Current Job and related documents
      • Work Experience Certificates
      • Address Proof in Candidate's Name (Electricity/Water/Phone Bill; Voter ID; Ration Card; Bank Passbook with One Year of Recent Statement; Passport)
      • Computer Education (if any)
      • 3 passport size recent photographs.
  • Keep visiting KJA website for more information and updates about the program.

Some useful links

Related Links

Monday, August 8, 2011

Picasa: How to add watermarks to photos

A friend mentioned today that it hurts when someone uses your photos and don't give you the credit for it. I completely understand his feelings. It happened with me. It happens with everybody!

There are many tools available to add watermarks to your photos. Here I'm going to tell you how to do it using Picasa. Because that's what I use!

You have to think about adding a watermark(some copyright) only when you are sharing the photo with others.  Using Picasa you can share photos with others mainly in two ways. By uploading them to a web album and sharing the link, or by exporting the photos to a folder.

We will see how to add watermark to your photos in both these cases.


  1. How to add watermarks while uploading photos to Picasa Web Album
    1. Open Picasa
    2. Goto Tools -> Options -> Web Albums
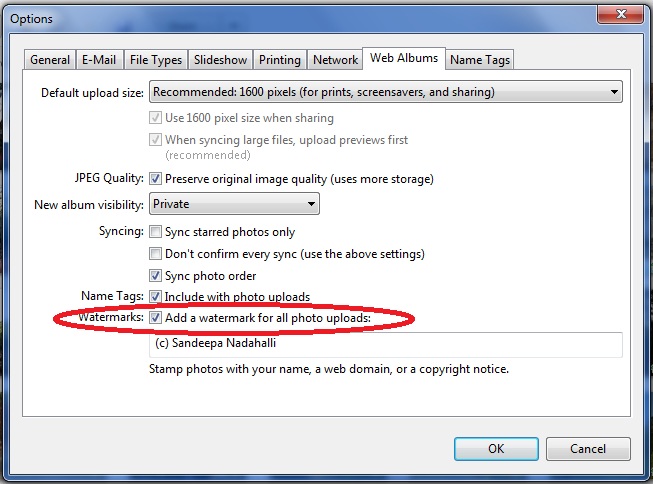
    3. In the dialog that pop's up,(see image below) select the check box for Watermarks.


    4. Enter the text for your water mark in the text box given. As you can see in the screenshot, I use "(c) Sandeepa Nadahalli".
    5. Click OK to exit the settings dialog. Your photos will be watermarked with the given text when you upload them.
  2. How to add watermarks while exporting photos from Picasa.
    1. Select the photos or Album you want to export
    2. Goto File -> Export Picture to Folder
    3. Select the check box next to Watermark:
    4. Enter the text to be used for watermarking.
    5. Click on the export button!
Here is a photo with a watermark (from my Picasa Web Album ).

Friday, July 1, 2011

Aadhar: What you need to know about it

Aadhar is again in news these days. I did some quick search and have compiled this post to help you know more about Aadhar.
  1. So, what is Aadhar?
    Aadhar is Multipurpose National Identity Card or Unique Identification card (UID Card). Though the project name mentions the word 'card', currently there's no plan to issue a card. They will be issuing only Aadhar number.

  2. Will I get an Aadhar card?
    No! You will just get unique Aadhar number.

  3. What's the use of Aadhar number? Why should I apply for Aadhar number?
    One of the answers I found on the official Aadhar Faq Page says:
      Aadhaar means foundation , therefore it is the base on which any delivery system can be built. Aadhaar can be used in any system which needs to establish the identity of a resident and/or provide secure access for the resident to services/benefits offered by the system. Aadhaar can be used in the delivery of the following programs:
      • Food & Nutrition – Public Distribution System, Food Security, Mid Day Meals, Integrated Child Development Scheme.
      • Employment – Mahatma Gandhi National Rural Employment Guarantee Scheme, Swarnajayanti Gram Swarozgar Yojana, Indira Awaaz Yojana, Prime Minister’s Employment Guarantee Program
      • Education – Sarva Shikhsha Abhiyaan, Right to Education
      • Inclusion & Social Security – Janani Suraksha Yojana, Development of Primitive Tribe Groups, Indira Gandhi National Old Age Pension Scheme
      • Healthcare – Rashtriya Swasthya Bima Yojana, Janashri Bima Yojana, Aam Aadmi Bima Yojana
      • Other miscellaneous purposes including Property Transactions, VoterID, PAN Card etc.

  4. What documents are accepted as Proof Of Identity(PoI) for Aadhar?
    • Passport
    • PAN Card
    • Ration or PDS photo card
    • Voter ID
    • Driving Licence
    • Government Photo ID Card
    • NREGS Job Card
    • Photo ID issued by recognized Educational Institution
    • Arms Licence
    • Bank ATM card with photo
    • Photo credit card
    • Pensioner photo card
    • Freedom Fighter Photo Card
    • CGHS or ECHS Photo Card
    • Address Card  having Name and photo issued by Department Of Post
    • Certificate of Identity issued by Group A Gazetted Officer

  5. What documents are accepted as Proof Of Address(PoA) for Aadhar?
    • Passport
    • Bank Statement or Passbook
    • Post Office Account Statement or Passbook
    • Ration Card
    • Voter ID
    • Driving Licence
    • Government Photo ID Card
    • Electricity Bill not older than 3 months
    • Water Bill not older than 3 months
    • Telephone land line bill not older than 3 months
  6. Can I apply for Aadhar online?As of today(1st July 2011), you can not apply online for Aadhar.
  7. How/where can I apply for Aadhar number?They have not started issuing Aadhar number in all the cities. Call up Aadhar helpline number ask for your nearest location.
  8. Aadhar helpline number?Call 18001801947
    • What's the information asked when applying for Aadhar number?
      Name,  Date of Birth, Gender, Address, Parent/Guardian details (required for children, adults may provide), Contact details phone and email (optional)
      Biometric Information required: Photo, 10 finger prints, Iris
    • Where can I find more information about Aadhar?
    If you know more information/resources on Aadhar, please share it in comments.

      Wednesday, June 15, 2011

      BSNL 3G: How To Recharge Online

      So you have a BSNL prepaid 3G card and don't know how to recharge it online? Here's how you can do it.

      1. Visit BSNL's website http://www.bsnl.co.in/
      2. Look out for the link(looks like the picture below!) for "Online recharge Topup, Flexi topup", click on it. Or click here if you can't find it there.
      3. Sign up by visiting http://portal.bsnl.in/portal/aspxfiles/registration.aspx if you do not already have a login.
      4. Login to recharge site using your login and password. You should see something like this screenshot.
      5. Choose the recharge or topup option based on your need. The data recharge and data topup options are similar to voice recharge and voice topup respectively. i. e.,
        1. BSNL 3G Data Topup: You get only extra data recharge and no extension to your validity!
        2. BSNL 3G Data Recharge: This options gives you both. Validity and data recharge. 
      6. Enter your 3G sim number. If you are using your 3G SIM with a data card, you are not likely to remember your 3G number. Double check the number by checking it from BSNL 3G application on your computer.
      7. Select the amount you want to recharge or topup your 3G mobile with.

        The numbers you see in the drop down do not make much sense! Unless you are familiar with BSNL 3G recharge plans, their validity and how much data you get to use in each plan.
        Go to their 3G website to learn more about the plans. Pick your plan and select the amount.
      8. Click on the Submit button to proceed for payment.
      9. Choose a payment method in the following page. They support bank transfers, Debit cards and credit cards.
      10. Go ahead with online payment just like the way you usually do.
      11. Take a print out of the receipt or save it on your computer for future reference.
      12. Continue to use your 3G card/mobile.
      ***************************************************
                 Related Link

        Wednesday, June 8, 2011

        How To Disable Facebook's Tag Suggestions

        Yesterday Facebook rolled out a new feature called Tag Suggestions.

        According to a blog post on The Facebook Blog, this is what the feature is all about:
        "When you or a friend upload new photos, we use face recognition software—similar to that found in many photo editing tools—to match your new photos to other photos you're tagged in. We group similar photos together and, whenever possible, suggest the name of the friend in the photos."
        Not surprisingly, this Face Recognition feature is enabled by default! This may be useful for some people who upload photos in bulk and tag everybody in every picture.

        For others, if you don't want Facebook to automatically detect your face and suggest tag to friends, here's how you can disable this feature. It's very simple! (takes only 7 clicks!)

        1. Click on Account 
        2. Click on Privacy Settings

          Privacy Settings page
        3. Click on Customize settings

        4. Scroll down to "Things others share" section. Click on the Edit Settings next to
          Suggest photos of me to friends
          When photos look like me, suggest my name

        5. Click on Enabled and change it to Disabled
        6. Click on Okay to save that setting.
        7. Congratulations! Now you can continue with your Facebooking, or whatever else you were doing before coming here :-)

        Monday, June 6, 2011

        How To Create a Facebook Page For Your Blog

        If you like to create a platform for all your blog readers to know each other and discuss about your blog,  Facebook Page is a good start. You can create a Facebook page for your blog. That will not only help your existing readers to network with each other, but also to easily share your blog posts on Facebook and increase readership. After creating the Facebook Page, you can create a 'Like box' and add it to your blog so that people who visit your blog can find the link to your facebook page and can 'Like' your page without leaving your blog.

        I just created a Facebook page for this blog. You can find the page here.

        Now I will share how to do it.

        First you need to create a Facebook page for your blog. Do the following:
        1. Login to your Facebook account. Scroll down to the end of the page. Click on the "Create a Page" link
          OR
          Click here to go start creating facebook page.
        2. Facebook will ask you to choose a category for your page. As of now, it has  6 categories at the top level. Choose "Brand or Product". I chose this because, this is the only category that had 'website' sub-category!
        3. Choose 'website' as sub category.
        4. Enter the name of the page. Keep it same as the title of your blog so that people can recognize it easily! (I used "My Life My Way")

        5. Now your page is ready! And you can see it has URL of it's own.
        6. Click on Edit info link to fill in details about your blog.
        7. Write a brief description in "Description" field.
        8. important: Paste the link to your blog in the "Website:" field. (http://sandeepaonlife.blogspot.com/)
        After this, you can follow the steps on your page to..
        1.  Add a profile image
        2. Invite your friends
        3. Tell your fans
        4. Post status updates
        5. Promote this Page on your website
        6. Set up your mobile phone
        Now that we have a facebook page, let's see how to add a 'Like box' to your blog.
        1. Click on the "Add Like Box" button.
        2. In the page that shows up, customize the Like Box for your blog
          1. Change the URL to point to your newly created facebook page
          2. Change the width of the widget if you want
          3. Pick a color scheme (to match your blog's theme)
          4. My Like Box looked something like this.
          5. My Like Box Looked like this
          6. As you customize your like box, verify the changes in the preview.
          7. Once you are happy with your customization, click on "Get Code" button.
        3. Get the code for the widget (copy it to clip board)


        4. Add it to your blog(Steps for Blogger blogs.)
          1. Login to your blogger account
          2. Goto "Design" tab of your blog 
          3. Click on the "Add a Gadget" link
          4. Choose HTML/JavaScript
          5. Paste the code you copied in step 3 above
          6. And save the widget!
          7. Congratulations! Now you have Like Box for your Facebook page integrated to your blog.
            (You can see the Like Box on the right side of this blog. You can see it working! )
        If you run into any problem/errors during this, share it in comments. I would be happy to assist.

        Tuesday, May 31, 2011

        How to generate a random string in java

        Want to generate a random alpha-numeric string in Java? Here's how you can do it.
        If you are into coding, sooner or later you will run into this!

        There are many ways to do it. Here's the one I used recently in my code.

        import java.security.SecureRandom;
        import java.math.BigInteger;
        
        SecureRandom srandom = new SecureRandom();
        String rand = new BigInteger(176, srandom).toString(32);
        /* and you have your random string in 'rand' */
        

        What random libraries/functions do you use?
        Write in comments.